Recipe

Stuffed Chestnut Mushrooms with Minced Prawn

IMG_20130323_185228_069

Yong tau foo is one of my favourite food. Whilst it is not easy to find delicious home made yong tau fu in Kuala Lumpur, thankfully there are still good yong tau fu in Ipoh.

I have been trying to recreate yong tau foo in my home in London and still searching for the best fishes to do so. However I didn’t stop at fishes only, I also tried prawns, which is just the right ingredient for yong tau foo too. I have tried to stuff with fried taufu, which is absolutely delicious. I bought some chestnut mushrooms the other day and when I saw the size, I thought I could also try to stuff with the paste. And voila! It is another to die for dish. The recipe is fairly easy and shouldn’t be too difficult to make. All you need is some love and patient! And this is a very versatile dish. You can stuff the paste with anything, such as aubergine, fried or non-fried taufu, bean curd sheet, bitter gourd, ladies fingers or okra, or just eat it on its own.

Enjoy!

Ingredients:

250g prawns, shells removed and deveined

2 carrots, diced

2 stalks of spring onion, diced

salt and white pepper to taste

1 tsp sesame oil

cornflour

For the sauce:

garlic, finely diced

oyster sauce

chestnut mushroom stalks, finely diced

10 chestnut mushroom

Methods:

1. Before you work on the minced meat, let’s focus on the diced carrots first. As prawns cooked fairly quickly, what I did was to blanch the diced carrots for about 15-20 mins in boiled water. Don’t boil the carrots as this may soften the carrots too much. By blanching, the carrots will be partially cooked and its crunchiness is retained. You need this texture in the paste to add another dimension to your dish.

2. In the meantime, you can move on to the prawns. Once the shells and vein of the prawns have been removed, you can either use a heavy knife to “mince” the prawn till it forms paste, which I like to use. Or you if you have a food processor, you can process the prawns in it. Just be careful not to process the meat too much till it becomes mousse. Not quite the right texture you want.

3. Season the prawn paste with salt, pepper, cornflour and water. Mix it evenly and then add a dash of sesame oil and mix again. Once you have done so, the fun part begins. Take a big enough bowl and by using a clean hand, scoop out the paste and raise it about 15-20 cm from the bowl, throw the minced prawn to the bowl. This is the secret to having bouncy meat balls. (I am still trying to find out the actual reason of how this will help the minced meat to become bouncy). Try it and you will love it. Again the texture will be different to normal minced meat balls. Repeat this for 10-20 times.  Once this is done, place the minced prawn in a bowl, wrap it with cling film and put in the fridge while proceeding on with the following steps.

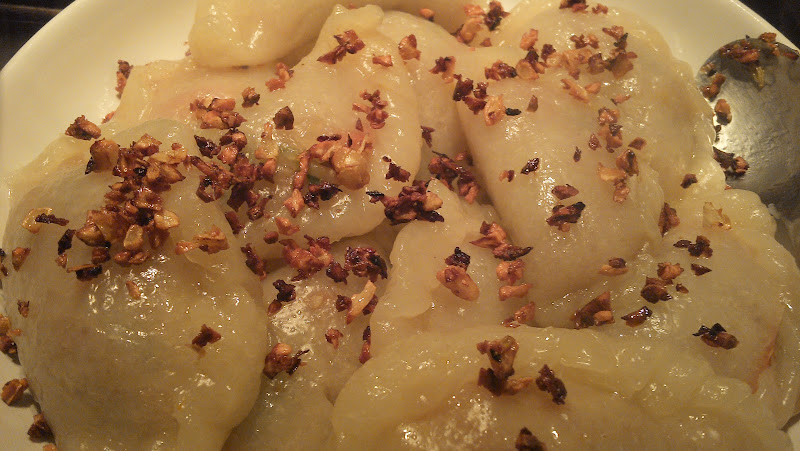
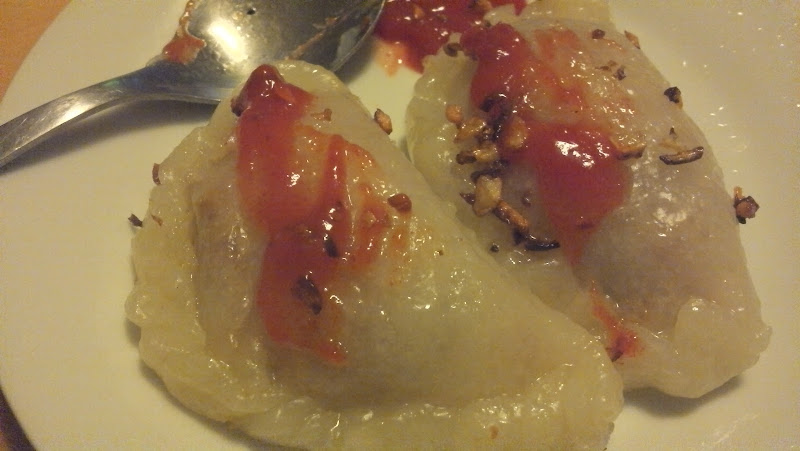
4. I use chestnut mushroom because it has nutty flavour than normal white button mushroom. Shiitake mushroom can be used as well, but it may not have the right shape to stuff the paste. If there are black dirts on the mushrooms, remove it with clean cloth or tissue. Once all have been checked and removed, run the mushrooms quickly in cold running water. Wipe the mushrooms with a clean kitchen towel or kitchen tissue. Then remove the stalks so that you can stuff it with the paste. But don’t throw the stalks away as you need it for sauce later on. Or if you want to use it for other dishes, by all means. Just don’t waste food.

5. Now you can take out the paste from the fridge. Mix the paste with the blanched carrots and spring onion. If you like other types of vegetable, make sure it has the right crunchiness and flavour. If I were to do this dish in Malaysia, I’d add water chestnuts.

6. Once it is all evenly mixed, heat up the pan or wok and pour in a small dash of oil. What you are going to do next is to taste it. You just want to make sure that you have seasoned the paste enough. So drop in few bits of the mixed paste and wait till it cooks. Taste it and add salt or pepper if necessary.

7. Again, wash your hand and in a fairly large bowl, pour cold water in it. This is for you to dip your hand in if the paste is sticking to your hand or fingers. You will be using your hand to work with the paste  a lot.

8. Once you are ready, scoop a handful of paste in your hand and form a smooth ball while pushing some paste through your thumb and index fingers. Use a spoon with the other hand to scoop out the paste from the thumb and index fingers. Stuff this formed prawn ball paste into the mushroom. Repeat till all  mushrooms are stuffed. As the final touch, wet your index,  middle and ring fingers with water and smooth the top of the paste. It should have shiny effect. Also you can use this opportunity to press the paste down to ensure it is tightly stuffed.

9. Now you can start to pan fried the paste and mushroom. Turn on the heat and add a dash of oil to the pan. First put the stuffed mushroom with the minced prawn facing down to the pan first. Fried till it brown. And turn the stuffed mushrooms over so to brown or cook the mushrooms. Remember to pan fry these with medium heat as you don’t want to burn it. You may need to cover the pan at this juncture to ensure the prawn is cooked thoroughly. You can obviously take one out and cut to see if it is all cooked, but by covering the pan for 5-10 mins, the prawn should be cooked.

10. Plate the mushroom and don’t worry if the mushrooms start to water. With the same pan, saute the garlic, and diced mushroom and add oyster sauce to taste. Pour it over the stuffed mushroom and enjoy!

Categories: Life, Mushrooms, Prawn, Recipe | Leave a comment

Chocolate Marble Cake

image

A friend gave me a bear silicone bake ware sometime last year and I didn’t have the chance to use it till today when I have this funny cake craving. Perhaps my deliberate weight loss diet has left me hanging without adequate sugar. And so with the remaining butter I have, I decided to bake marbled chocolate cake.

I somehow did something very awful to the bear by decorating it with few walnuts and some strawberry jam on the body, thinking it will add a bit of colour to it. Well I need to work a lot more on my artistry skill. Anyhow, the cake is moist and delicious! I hope substance will win over the form! I’ll try to decorate it better next time. In the meantime, enjoy the recipe, it is easy to bake!

Ingredients:

200g butter

200g caster sugar

200g self raising flour

4 eggs

1 vanilla pod

1.5 tbsp chocolate powder (cooking or drinking)

Method:

1. Heat the oven to 180 degree celcius. I used a silicone bake ware given by a friend instead of the normal cake tin. It is easy to use and I didn’t have to line the baking or parchment paper.

2. Cream the butter and sugar together and mix well. Add one egg at a time and mix with the batter till smooth. Once all eggs are added, sift flour bit by bit to the batter and fold.

3. Divide the batter into 2 portions. Mix one portion with chocolate powder. I also added a drop of Irish Coffee Liquor. Add either vanilla seeds or vanilla essence to the other portion.

4. Scoop one spoon of the chocolate batter to the silicone bake ware and then followed by the vanilla portion and repeat this till batters in both portions are used up.

5. Tap the bottom of the bake ware to ensure all air bubbles are released and use a spoon or sticks to stir the batter a bit to create that marbled effect. But do not mix it, otherwise, the batter will become all chocolatey.

6. Finally bake the batter, for about 30-45 mins, or use a stick and insert to the centre of the cake. If it is cooked, the stick will come out without any sign of batter. Else, let it continue to bake till the same the stick comes out clean from the centre of the cake.

7. Turn off the oven once it is cooked and let it cool on a cooling rack.

Categories: Recipe | 4 Comments

Steamed Vegetable Dumpling

Steamed vegetable dumpling or known as “chai kueh” is one of my favourite nyonya food. Nyonya is the term for women descendants of the Malay-Chinese.

This dish is a simple dish with just few ingredients, i.e. chinese turnips or mooli as it labelled in Tesco, carrots, dried shrimps available in most of Chinese supermarkets in London, wheat starch and tapioca flour, boiling water and oil. I referred to my favourite blog of a Bee, Malaysian Nyonya food website:

http://nyonyafood.rasamalaysia.com/chai-kueh-steamed-vegetable-dumplings/2/

I like to eat the dumplings with fried garlic and chili sauce.

Ingredients

Fillings:

400 g mooli or Chinese Turnip (available at Tesco or Chinese supermarkets), julienne

100 g carrots, julienne

2-3 stalks of spring onions, julienne

1 bulb of garlic, chopped

2-3 tbsp dried shrimps, wash and soak for 10-15 mins (available at most Chinese supermarkets)

oyster sauce

salt and pepper

Skin:

165 g wheat starch flour (or “tang min fun” 澄麵粉)

85 g tapioca flour (or 樹薯粉)

420 ml boiling water

5 tbsp oil

Instructions:

1. Heat up 4-5 Tbsp oil and stir in half of the chopped garlic till fragrant. Add in dried prawns and fry till fragrant.

2. Add in carrots and Stir fry for about 5 minutes or till fragrant. Then add mooli and spring onion stir for another 4-5 mins till cooked. Add in salt, oyster sauce and pepper to taste. Season slightly more considering the skin is bland.

3. Leave it to cool.

4. In the meantime, prepare the steamer and if you are not going to use the Chinese simmer but 3 tier  vegetable steamer, I used the steaming bowl/ containers to put the dumplings. Oil the containers so that the dumplings won’t stick on it later on.

5. Moving on to the skin, first sift the flours and mix it. Then add a third of the boiling water and stir the flours and water with a wooden spoon. Add another third once the flour is mixed and finally the final third and mix it till a soft dough formed.

6. You need to knead the dough, but not immediately as it is too hot now. So let it rest for about 5-10 mins or at least when it is not too hot to handle.

7. Before kneading the dough, add tbsp of oil to the dough and knead. Continue to add oil if you can still see lumps in the dough. Knead till it is smooth looking.

8. Then roll it and divide into 30 pieces or so. Roll out a piece till about the size of your palm and put the fillings in the middle. Fold it and “pleat” the edge.

9. Put the finished dumpling in a container/ steamer/ steaming bowl and continue with the rest. Once it is all filled up, steam for 15-20 mins or when the dumpling is translucent.

10. Fried the chopped garlic so that you can sprinkle on top of the dumplings and don’t forget the chili sauce.

Categories: Food, Life, Recipe | Tags: , , | 3 Comments

“Mantau” Recipe

300 g all purpose flour (plain flour)

3 teaspoons baking powder

110g superfine sugar (caster)

1/2 cup or 125 ml milk

1/3 cup or 90 ml water

1/4 cup or 60 ml vegetable oil.

Instructions

1. Sift flour and baking powder into a bowl and add sugar.

2. Gradually add combined milk and water and mixing to form a soft dough.

3. Add oil 1 tsp and knead it on a work surface. Add another tsp of oil and knead till the dough is smooth.  Another cue is when there is no more lumps in the dough can be seen.

4. Wrap dough with cling film and let it rest in the fridge for an hour.

5. Meanwhile, cut 16 squares parchment or baking paper to place the buns later.

6. After an hour, take the dough out from the fridge and roll dough into a sausage shape, roundabout 16 inches long.

7. Cut into 16 pieces and roll each into a ball.

8. As this is mantou, therefore no fillings and these balls can be put on the parchment or baking papers.

9. Use a steamer to steam the mantou for about 15-18 mins.

Categories: Food, Life, Recipe | Leave a comment

Chocolate Fondant

IMG_20130119_135848_609

This is the 2nd attempt of my chocolate fondant. I didn’t take the picture of the first one I baked yesterday but I followed the instruction to only put the cake in the oven set to 200 degree Celcius for 10-12 minutes. I followed it but when I removed it out from its mould, only half of it cooked. Not the middle where the gooey  part should  be but the whole bottom part of the cake.

So I extended the time for the 2nd attempt to probably up to 25 – 30 minutes. I just want to make sure the bottom is cooked and not liquid. The bottom was ok, but so was the middle part. There is no chocolate oozing out as it should be. The middle is still a bit wet but taste good. The picture is a bit blur as I was wrestling with my husband to take the picture while he was busy helping himself with the cake.

The 3rd attempt, I shall only bake for 18-20 mins. The results will be updated.

Recipe (From BBC Gordon Ramsay)

http://www.bbcgoodfood.com/recipes/8168/chocolate-fondant

  • 50g melted butter , for brushing
  • cocoa powder , for dusting
  • 200g good-quality dark chocolate , chopped into small pieces
  • 200g butter , in small pieces
  • 200g golden caster sugar
  • eggs and 4 yolks
  • 200g plain flour

Instructions:

  1. First get your moulds ready. Using upward strokes, heavily brush the melted butter all over the inside of the pudding mould. Place the mould in the fridge or freezer. Brush more melted butter over the chilled butter, then add a good spoonful of cocoa powder into the mould. Tip the mould so the powder completely coats the butter. Tap any excess cocoa back into the jar, then repeat with 1 the next mould.
  2. Place a bowl over a pan of barely simmering water, then slowly melt the chocolate and butter together. Remove bowl from the heat and stir until smooth. Leave to cool for about 10 mins.
  3. In a separate bowl whisk the eggs and yolks together with the sugar until thick and pale and the whisk leaves a trail; use an electric whisk if you want. Sift the flour into the eggs, then beat together.
  4. Pour the melted chocolate into the egg mixture in thirds, beating well between each addition, until all the chocolate is added and the mixture is completely combined to a loose cake batter.
  5. Tip the fondant batter into a jug, then evenly divide between the moulds. The fondants can now be frozen for up to a month and cooked from frozen. Chill for at least 20 mins or up to the night before. To bake from frozen, simply carry on as stated, adding 5 mins more to the cooking time.
  6. Heat oven to 200C/fan 180C/gas 6. Place the fondants on a baking tray, then cook for 10-12 mins until the tops have formed a crust and they are starting to come away from the sides of their moulds. Remove from the oven, then leave to sit for 1 min before turning out.
  7. Loosen the fondants by moving the tops very gently so they come away from the sides, easing them out of the moulds. Tip each fondant slightly onto your hand so you know it has come away, then tip back into the mould ready to plate up.
  8. Starting from the middle of each plate, squeeze a spiral of caramel sauce – do all the plates you need before you go on to the next stage. (I skipped this part as not a big fan of caramel)
  9. Sit a fondant in the middle of each plate. Using a large spoon dipped in hot water, scoop a ‘quenelle’ of ice cream.
  10. Carefully place the ice cream on top of the fondant, then serve immediately. Repeat with the rest of the fondants. (I used yogurt instead).
Categories: Food, Recipe | Tags: , | 2 Comments

Tofulogy – An experiment to make tofu fa at home!

I am an avid fan of tofu, be it eaten as dessert or savoury dishes.  It is not hard to make your own tofu fa. The hardest would be how to make it silky smooth, soft but not too watery. But aside from that, my main dillema is the magic ingredient to turn the soya bean milk to bean curd, which is addressed as coagulation process.

All tofu starts from soya beans to my best knowledge. Back in the olden days, soya beans are grinded with millstones to obtain the soyamilk. This is still in practice nowadays and delightfully, we managed to find a few dessert shops in Hong Kong that are still using this method (which I have forgotten the name of the dessert shop we went and validated that they use stone mill to grind soya beans and others such as sesame, hazelnuts, etc). We also went to 石磨坊 (Shek Mo Fong), which literally means “stone mill”, which I hope they really are using this method to grind the soya beans in Kowloon.

It is a hard labour to use the stone mill or can be substituted with grain grinder. In the absence of these tools, blender has come to my rescue. I used the normal blender to blend the soya beans, with added water.

To start with, the soya beans needed to be soaked overnight preferrably, in hot water, in order to remove the skins. Once that is done, put the soya beans into the blender and water. Unless you have those blenders that separate the residuals and water, otherwise, use cheese cloth to separate them. How?? Just pour whatever in the blender onto the cloth, with a big bowl as the catchment of the soyamilk. The residuals or pulps should be on top of the cloth and wrap it up, and press the pulps to the last drop of soya milk that you could get. Put the pulps in another big bowl and continue with the rest of what you have in the blender.

Once that is all done, pour some water over the bowl which contains the residuals and repeat the steps again to squeeze the added water to the soya milk. Don’t waste!

Now that you have soya milk, next is to make the tofu! Pour the soya milk into a big pot and simmer it till boiling. While simmering it, a layer of curd will formed, and that is officially a beancurd sheet made!

The “magic” ingredient to turn the soy milk to bean curd or known as coagulation  is gypsum, which is claimed to have calcium, and apparently have been approvced by US Food & Drug Administration. As a Chinese descendant, I always knew that gypsum is used to make tofu. But only recently I found out that there are other coagulation ingredients. There are some parts of Korea and Japan use seawater/ sea salt to solidify tofu.

Now, the main question is, wouldn’t the seawater makes the tofu salty? It’ll be fine if tofu is prepared as a savoury dish, but how about if we want to make tofu pudding, which is a kind of dessert? I need to put this into a test.

As an alternative, similar concept to making ginger milk curd, can I use ginger juice to make tofu as well? Again, my main challenge is how to reduce the gingery and hotness? As this is a dessert that I want to make, therefore I can still add sugar to the soyamilk before curdling to tofu. This should solved the problem. I don’t even use ginger sugar syrup!

This will be something I’ll explore next weekend!

Update: 

Since this posting, I did make tofu at home, but more of soya milk curd using ginger sugar syrup. It works, for sure as I have tried many times. But the biggest revelation I found was gypsum was not a bad thing afterall. In fact, it has some medicinal effect in accordance to Traditional Chinese Medicine. I haven’t managed to find gypsum in the UK yet so I haven’t managed to try to make tofu using gypsum. Nor the sea water or sea salt from Japanese or Korean stores. I’m still curious whether the Japanese sea salt will make the tofu salty. Or is it other type of sea salt and not the natural one.

Categories: Chinese, Food, Recipe | 2 Comments

Blog at WordPress.com.